Step-by-Step Guide to Creating Homemade Candles: A Beginner's Journey
- Oct 2, 2024
- 3 min read
Welcome to your beginner's journey into the art of making homemade candles. In this guide, we will walk you through the step-by-step process of crafting your very own candles right at home. Whether you're looking for a creative hobby, a personalized gift idea, or simply want to add a cozy ambiance to your space, making candles is a rewarding and enjoyable activity.

Getting Started: Gathering Your Materials
The first step in your candle-making journey is to gather all the necessary materials. You will need wax (soy wax or beeswax are popular choices), candle wicks, a double boiler or microwave-safe container, fragrance oils (optional), and containers to hold the candles. Be sure to set up your workspace in a well-ventilated area and protect your surfaces with newspapers or a tablecloth.
Melting the Wax
Once you have all your materials ready, it's time to melt the wax. If you're using a double boiler, place the wax in the top pan and heat it gently until completely melted. If using a microwave, heat the wax in short intervals, stirring in between to ensure even melting. Be cautious as hot wax can cause burns.
Adding Fragrance (Optional)
To add a delightful aroma to your candles, now is the time to mix in your favorite fragrance oils. Be creative and experiment with different scents to create a unique sensory experience. Remember, a little goes a long way, so start with a small amount and adjust to your preference.
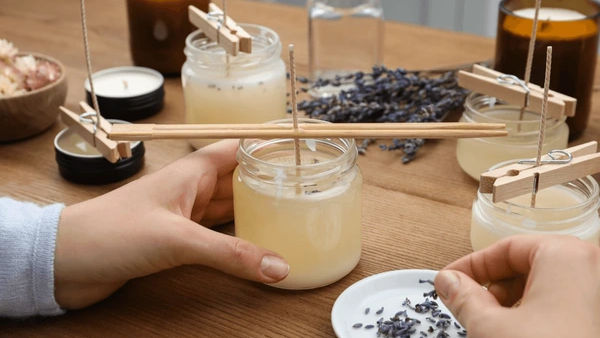
Preparing the Containers
While the wax is still hot, secure the candle wick at the bottom of your containers using a wick holder or adhesive. Ensure the wick stands upright and centered to allow for an even burn. You can get creative with the containers you use, from mason jars to teacups – the choice is yours!
Pouring the Wax
Carefully pour the melted wax into your prepared containers. Leave a small space at the top to avoid spillage. As the wax cools, it will solidify, so be patient during this process. You will start to see your candles taking shape, ready to bring warmth and light to any room.
Allowing the Candles to Set
Once the wax has cooled and solidified, let your candles sit undisturbed for several hours or overnight. This waiting period is crucial to ensure that the candles set properly and are ready for burning. Avoid moving the candles around to prevent any mishaps.
Final Touches
After your candles have completely set, trim the wicks to a suitable length (about half an inch) using scissors. This step not only tidies up the candles but also helps them burn evenly. Your homemade candles are now finished and ready to be enjoyed!
Conclusion
Congratulations on completing your beginner's journey into the world of homemade candles! Crafting your candles is a fulfilling and creative process that allows you to customize your scents and designs. Whether you keep them for yourself or give them as heartfelt gifts to friends and family, homemade candles are sure to bring joy and warmth to any space.
So, gather your supplies, melt the wax, pour with care, and let your creativity shine through in every handmade candle. Start your candle-making adventure today and illuminate your world with the magic of homemade candles.
Ready to start your candle-making journey? Get all the supplies you need with these helpful links:
Don't wait to bring the warmth and creativity of candle-making into your home. Click on the links above to stock up on high-quality supplies and start crafting your own unique candles today!


Comments